You likely arrived at this article because you’ve already heard about Clean Architecture and perhaps conducted some research on it. However, you might still be unsure about how to implement it in a real-life project. This guide aims to bridge that gap by providing practical insights and examples to help you apply Clean Architecture principles effectively in your development work.
I will illustrate Clean Architecture using an example built on the Nest.js framework. However, the core concepts can be applied to other frameworks or programming languages as well. The fundamental idea remains consistent across different technologies.
What’s the clean architecture?
Clean Architecture, as defined by Robert C. Martin (often referred to as “Uncle Bob”), is a software design philosophy emphasizing the separation of concerns and independence of software components. Here are the key principles of Clean Architecture:
1. Independence of Frameworks: The architecture should not depend on the existence of some library of feature-laden software. This allows you to use such frameworks as tools, rather than having the architecture dictated by them.
2. Testability: The business rules can be tested without the user interface, database, web server, or any other external element.
3. Independence of UI: The UI can change easily, without changing the rest of the system. For example, a web UI could be replaced with a console UI, without changing the business rules.
4. Independence of Database: You can swap out PostgreSQL, for Mongo, SQLite, Firestore, or something else. Your business rules are not bound to the database.
5. Independence of any External Agency: In fact, your business rules simply don’t know anything at all about the outside world.
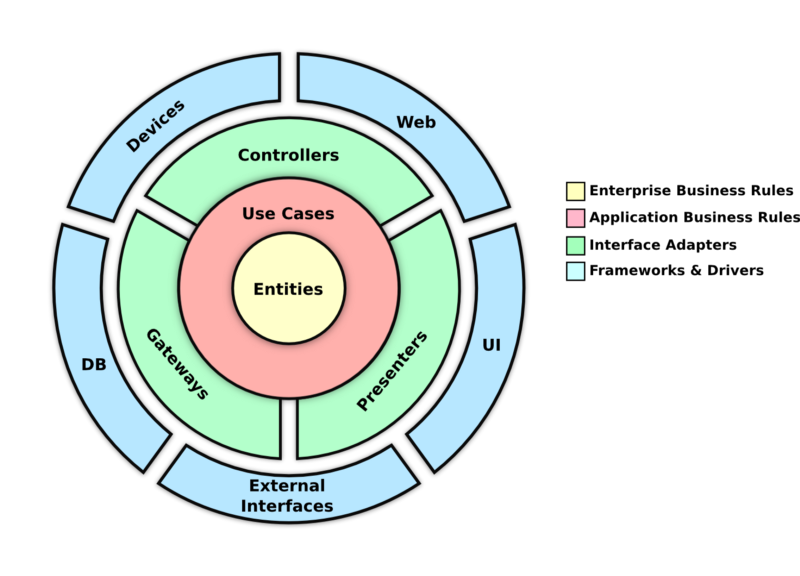
Clean Architecture (Uncle Bob)
The architecture is often visualized as a series of concentric circles, with the innermost circle representing the most abstract and high-level policies, and the outer circles containing more concrete and lower-level details. The core idea is that dependencies can only point inward, and code in the inner circles should have no knowledge of functions or classes in the outer circles.
The main layers of Clean Architecture typically include:
• Entities: Enterprise-wide business rules.
• Use Cases: Application-specific business rules.
• Interface Adapters: Converting and presenting data from the use cases and entities to whatever format is most convenient for the framework.
• Frameworks and Drivers: External agents like the UI, database, and web frameworks.
This architecture promotes a design where the business logic can be tested independently of the user interface, database, and other external elements, thereby making the system more maintainable and adaptable.
Often the Entities and Use Cases layers are represented as one — Business layer, which will be also our case.
Example project
This project is a simple “library” application — a REST API that provides CRUD operations for books and authors. The goal was to maintain simplicity while offering a clear example of implementing Clean Architecture. This approach avoids unnecessary complexity, making the project an excellent learning resource. And I am sure you’re tired of TODO apps.
You can find it on GitHub.
The project structure is organized with the application code located in the /app directory. Additionally, a docker-compose file is provided in the root directory to facilitate setting up a PostgreSQL database used by the project.
Setup Instructions
1. Environment Configuration:
▪ Duplicate the .env.template file and rename it to .env.
▪ Ensure you provide the correct values for the environment variables specified in this file.
2. External Service Integration:
The project includes an example integration with a third-party service, Resend. This is demonstrated through the RESEND_API_KEY environment variable. If you have a Resend account, you can use your own API key by setting it in the .env file. However, this is not mandatory when running the project.
3. Docker environment
Project contains a docker-compose file with a PostgreSQL database.
The project
The refactoring to Clean Architecture is based on a simple 3-tier application structure. This setup includes two primary modules: BooksModule and AuthorsModule.
Each module consists of:
• Controllers: These expose the endpoints for the REST API, handling incoming HTTP requests and responses.
• Services: These contain the business logic, acting as an intermediary between the controllers and the data layer.
• Repositories: These are injected into the services and are responsible for data access and manipulation, utilizing the external package TypeORM.
This foundational structure provides a straightforward starting point for implementing Clean Architecture principles, ensuring a clear separation of concerns and enhancing maintainability.
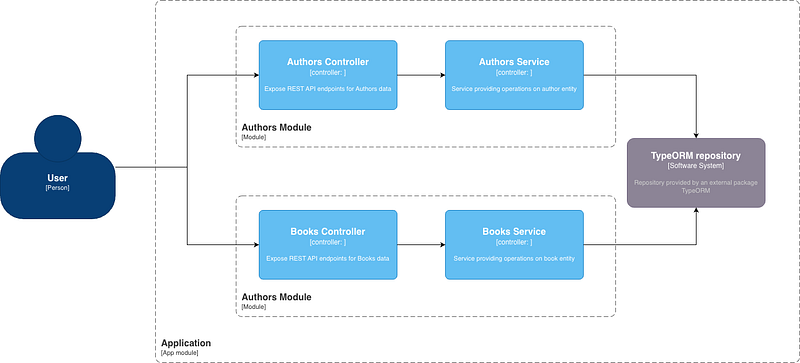
Diagram of components and modules
The code of this base application is available here: https://github.com/peterkracik/nestjs-clean-architecture/tree/1.0
Refactoring to the Clean architecture
Folder structure
Clean Architecture does not prescribe a specific folder structure. Instead, it is a coding methodology that can be adapted based on the programming language, framework, and project size. You have the flexibility to choose naming conventions and structures that best fit your project. In this example, the folder structure is organized as follows:
domain: This directory contains the core business logic, including entities and use cases. It represents the heart of the application, independent of external frameworks and technologies.
gateway: This folder houses the presenter layer — interface adapters. Although “interfaces” might be a common name, it was intentionally avoided here to prevent confusion with TypeScript interface files.
Frameworks: This section includes the details of the implementation related to frameworks, drivers, and third-party modules. It serves as the layer where external dependencies are integrated with the core business logic.
main.ts and AppModule as an entry point for the applications.
ProvidersModule — acts as a module for supplying abstracted framework modules to the application. This module plays a crucial role in decoupling the application logic from specific framework implementations, and we’ll dive deeper into its function later in the article.
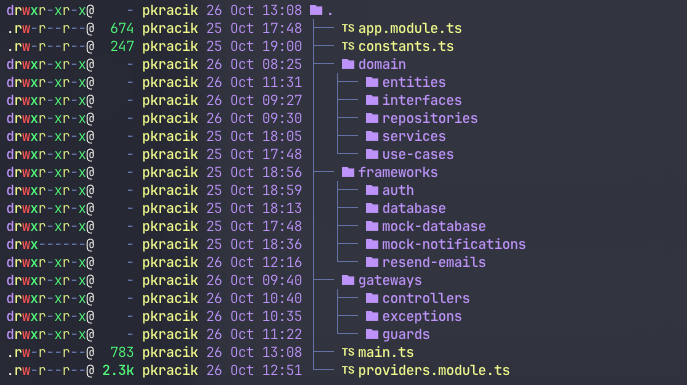
I also like to incorporate this separation into the tsconfig.json file by defining path aliases. This approach simplifies imports throughout the project, making the codebase cleaner and more maintainable.
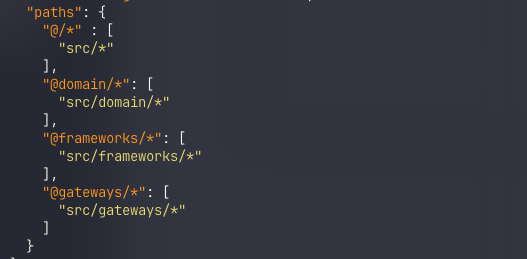
paths defined in the tsconfig.json
Controllers
Logically, we should begin by developing the business logic and then expose it via controllers. However, doing so makes it challenging to test whether existing functionality remains intact. Therefore, we start with the controllers.
In the gateways/controllers directory, we create a Nest.js module named ControllerModule and set up folders for books and authors.
2. Within these folders, we copy the controllers and DTOs from the original application. For now, we remove any dependencies and logic within the methods, as illustrated here: https://github.com/peterkracik/nestjs-clean-architecture/commit/59198ae9ca48e50471a69bc68731dcd4056120e0
3. Define the newly created controllers within the controllers property of the ControllersModule.
4. In the AppModule, remove the original imports of BooksModule and AuthorsModule. Replace them with the new ControllersModule.
At this point, endpoints should be accessible as before, but without real data.
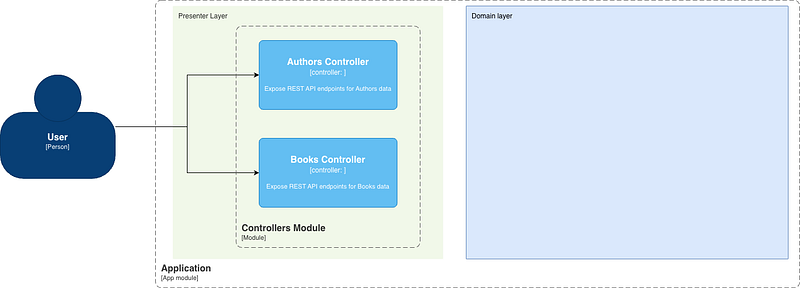
Current state of the application
source code: https://github.com/peterkracik/nestjs-clean-architecture/commits/1.1
Use Cases
To implement the business logic following the Clean Architecture principles, we can start by setting up the necessary modules and interfaces.
First, we’ll create an empty UseCasesModule which will contain our use cases.
Define a BaseUseCase interface. This interface will be implemented by all use cases.
Create interfaces for Book and Author to represent the domain entities.
we’ll import the UseCasesModule into the ControllersModule. This allows controllers to interact with the use cases.
As the Clean Architecture dictates, inner layers, such as use cases, are unaware of outer layers (e.g., gateways and controllers). However, outer layers can implement inner layers. If our application used different interfaces, such as an event handler or a terminal application, these endpoints would also reside within our gateways. They would be defined similarly to controllers and would also import the UseCasesModule to interact with the business logic.
To implement the use cases following the principles of Clean Architecture, we’ll create separate injectable services (use cases) for each functionality of the original BooksService and AuthorsService: findAll, findById, and create. Each service will encapsulate a single use case. This approach enhances modularity and makes testing and maintaining the code easier.
Every use case class will implement the previously created BaseUseCase interface. We can keep them empty or with some mock data to test if the application still works like here.
// src/domain/usecases/books/get-all-books.usecase.ts
import { Injectable } from '@nestjs/common';
import { BaseUseCase } from '@domain/use-cases/base-use-case.interface';
import { Book } from '@domain/interfaces/book';

@Injectable()
export class GetAllBooksUseCase implements BaseUseCase {
  constructor() {}
  async execute(): Promise<Book[]> {
    return [];
  }
}
All use cases have to be defined as providers in the module and exported, so the ControllersModule can inject them to controllers:
// src/domain/usecases/use-cases.module.ts
import { Module } from '@nestjs/common';
import { CreateBookUseCase } from './books/create-book.usecase';
import { GetBookByIdUseCase } from './books/get-book-by-id.usecase';
import { GetAllBooksUseCase } from './books/get-all-books.usecase';
import { CreateAuthorUseCase } from './authors/create-author.usecase';
import { GetAuthorByIdUseCase } from './authors/get-author-by-id.usecase';
import { GetAllAuthorsUseCase } from './authors/get-all-authors.usecase';

const useCases = [
  GetAllAuthorsUseCase,
  GetAuthorByIdUseCase,
  CreateAuthorUseCase,
  GetAllBooksUseCase,
  GetBookByIdUseCase,
  CreateBookUseCase,
];

@Module({
  imports: [],
  providers: [...useCases],
  exports: [...useCases],
})
export class UseCasesModule {}
To inject them into the controllers, we provide them in the constructor as follows:
// src/gateways/controllers/books/books.controller.ts
import { CreateBookUseCase } from '@domain/use-cases/books/create-book.usecase';
import { GetBookByIdUseCase } from '@domain/use-cases/books/get-book-by-id.usecase';
import { GetAllBooksUseCase } from '@domain/use-cases/books/get-all-books.usecase';

@Controller('books')
export class BooksController {
  constructor(
    private readonly createBookUseCase: CreateBookUseCase,
    private readonly getBookByIdUseCase: GetBookByIdUseCase,
    private readonly getAllBooksUseCase: GetAllBooksUseCase,
  ) {}

  @Get()
  @ApiOkResponse({ type: Array<BookDto> })
  findAll() {
    return this.getAllBooksUseCase.execute();
  }
...
Some frameworks support injecting directly to the method as a parameter ie. Laravel or Symfony.
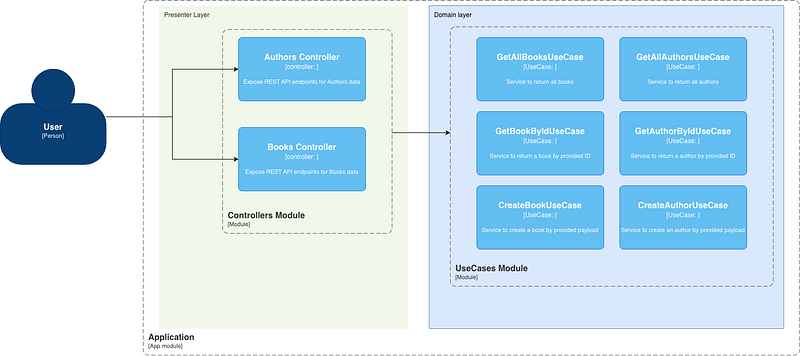
Implemented UseCasesModule and use cases
source code: https://github.com/peterkracik/nestjs-clean-architecture/tree/1.2/app/src
Domain-specific interfaces and repositories
To provide the functionality of a framework or driver while adhering to the principles of Clean Architecture — where inner layers are not aware of outer layers — we use dependency inversion. We define the required functionalities through interfaces, and then a class within the framework or driver implements these interfaces.
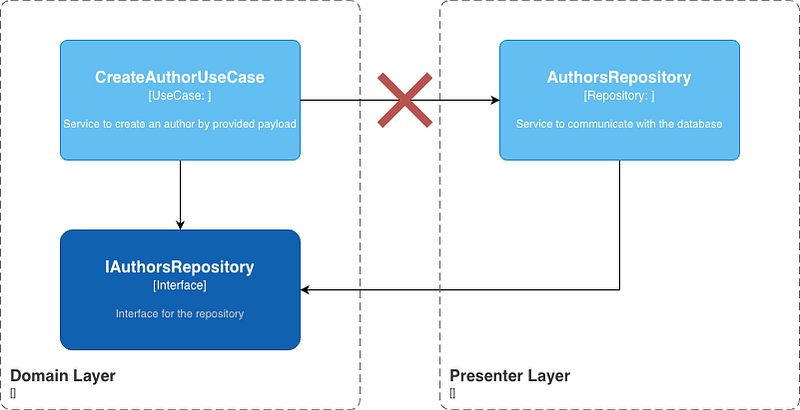
Dependency inversion for implementation of a repository
For our application, we need two interfaces to represent the actual objects: IBook and IAuthor. Additionally, we require two interfaces to define the repositories: IBooksRepository and IAuthorsRepository. All of these interfaces are straightforward and serve to establish clear contracts within the application architecture.
// src/domain/interfaces/author.interface.ts
export interface IAuthor {
  id: number;
  firstName: string;
  lastName: string;
  books?: IBook[];
}
// src/domain/repositories/authors-repository.interface.ts
export interface IAuthorsRepository {
  findAll(): Promise<Array<IAuthor>>;
  findById(id: number): Promise<IAuthor>;
  add(payload: DeepPartial<IAuthor>): Promise<IAuthor>;
}
Frameworks
Now that we have the business logic ready, we need to connect it to real data from an external source. This source could be an SQL database, NoSQL database, file storage, memory store, or an external API. In our example, we will connect it to the already existing PostgreSQL database, which served the original application.
In the folder src/frameworks/database we create:
DatabaseModule —a module that imports external package TypeORM, registers and exports repositories. It is defined as a dynamic module allowing us to define required properties. (Dynamic modules are out of the scope of this article, and I won’t dive into their creation and module definitions, more info here)
entities AuthorEntity and BookEntity implementing the corresponding interfaces from the domain.
repositories BooksRepository and AuthorRepository implement the corresponding interfaces from the domain.
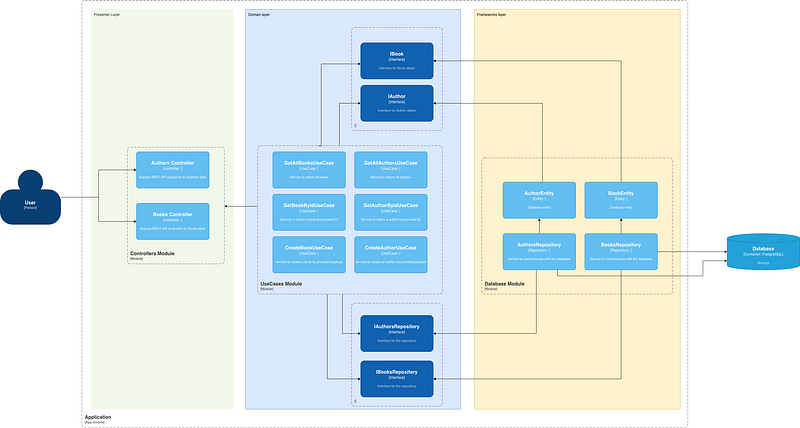
Diagram implementing the DatabaseModule
Providers — the magic of Nest.js
Providers are a fundamental concept in Nest. Many of the basic Nest classes may be treated as a provider — services, repositories, factories, helpers, and so on. The main idea of a provider is that it can be injected as a dependency; this means objects can create various relationships with each other, and the function of “wiring up” these objects can largely be delegated to the Nest runtime system.
This feature allows us to inject our database repositories or other services provided by our frameworks and drivers. By leveraging the dynamic module capabilities, we can configure and manage dependencies efficiently.
Providers Module
We’ve already mentioned this module, and now I will explain its purpose. It serves as a bridge to provide the necessary injections required by our domain layer. This ensures that the domain layer can access the data and services it needs without being directly dependent on the underlying frameworks or drivers.
In this module, we import all the drivers and frameworks that need to be injected into other layers.
Within the providers block, we define which class, function, or value we want to assign, along with the name that will represent this provider.
We then export the provider, not the service, ensuring that other parts of the application can access the necessary dependencies without directly coupling to the underlying implementations.
However, in this example, I use a hardcoded string, the good practice is to define it as constants.
And we add this module into the imports of AppModule.
// src/providers.module.ts
@Global() // must be defined as global
@Module({
  imports: [
    // import DatabaseModule and definition of required options
    DatabaseModule.forRoot({
      type: 'postgres',
      host: 'localhost',
      port: 5432,
      username: 'postgres',
      password: 'postgres',
      database: 'postgres',
    }),
  ],
  providers: [
    {
      // providing BooksRepository under name BOOKS_REPOSITORY
      provide: 'BOOKS_REPOSITORY',
      useExisting: BooksRepository,
    },
    {
      provide: 'AUTHORS_REPOSITORY',
      useExisting: AuthorsRepository,
    }
  ],
  // export of providers
  exports: [
    'BOOKS_REPOSITORY',
    'AUTHORS_REPOSITORY',
  ],
})
export class ProvidersModule {}
Injecting providers
Using the providers defined earlier is straightforward. We can take advantage of the @Inject decorator provided by NestJS. Since the BookRepository from the DatabaseModule implements IBooksRepository, we can easily inject it into our use case.
This allows the use case to access the necessary data operations without being directly dependent on the specific implementation of the repository.
// src/domain/usecases/books/get-all-books.usecase.ts
import { Inject, Injectable } from '@nestjs/common';

@Injectable()
export class GetAllBooksUseCase implements BaseUseCase {
  constructor(
    @Inject('BOOKS_REPOSITORY')
    private readonly booksRepository: IBooksRepository,
  ) {}
  async execute(): Promise<IBook[]> {
    return this.booksRepository.findAll();
  }
}
source code: https://github.com/peterkracik/nestjs-clean-architecture/tree/1.3/app/src/domain/use-cases
Demonstrating Its Brilliance
Let’s create another module that will serve as a mock database — MockDatabaseModule.
// src/frameworks/mock-database/mock-database.module.ts
import { booksMock } from './mocks/books.mock';
import { authorsMock } from './mocks/authors.mock';
@Module({
  providers: [
    BooksRepository,
    AuthorsRepository,
    {
      provide: 'BOOKS_MOCK',
      useValue: booksMock,
    },
    {
      provide: 'AUTHORS_MOCK',
      useValue: authorsMock,
    },
  ],
  exports: [BooksRepository, AuthorsRepository],
})
export class MockDatabaseModule {}
We utilized providers in this module to supply two simple variables that export mock values for authors and books.
// src/frameworks/mock-database/mocks/books.mock.ts
export const booksMock: IBook[] = [
  {
    id: 1,
    title: 'The Hobbit',
    author: {
      id: 1,
      firstName: 'J.R.R.',
      lastName: 'Tolkien',
    },
  },
...
]
and the repository which implements the IBookRepository interface, and injects defined mock.
// src/frameworks/mock-database/repositories/books.repository.ts
@Injectable()
export class BooksRepository implements IBooksRepository {
  constructor(@Inject('BOOKS_MOCK') private books: IBook[]) {}
  findAll(): Promise<Array<IBook>> {
    return Promise.resolve(this.books);
  }
  add(payload: DeepPartial<IBook>): Promise<IBook> {
    payload.id = this.books.length + 1;
    this.books.push(payload as IBook);
    return Promise.resolve(payload as IBook);
  }

  findById(id: number): Promise<IBook> {
    return Promise.resolve(this.books.find((w) => w.id === id));
  }
}
Inside our ProvidersModule, we can define which database module is used by implementing a simple condition, such as an environment variable. This approach is useful for scenarios like end-to-end (e2e) testing, where you might want to switch between different database configurations. And it does not require any change in other parts of the application.
Simple MAGIC! 💫
// src/providers.module.ts
@Global()
@Module({
  imports: [
    DatabaseModule.forRoot({...}),
    MockDatabaseModule,
  ],
  providers: [
    {
      provide: BOOKS_REPOSITORY,
      useExisting: process.env.MOCK ? MockBooksRepository : BooksRepository,
    },
    {
      provide: AUTHORS_REPOSITORY,
      useExisting: process.env.MOCK ? MockAuthorsRepository : AuthorsRepository,
    },
  ],
  exports: [BOOKS_REPOSITORY, AUTHORS_REPOSITORY],
})
source code: https://github.com/peterkracik/nestjs-clean-architecture/blob/1.5/app/src/providers.module.ts
Examples of additional frameworks
Sending notification service
To demonstrate other types of services beyond a database, I implemented two notification modules: ResendEmailsModule, which sends emails using the SaaS service Resend, and MockNotifications, which simply logs the requested notifications to the console. Since both modules implement the same INotificationsService interface, they are interchangeable, just like the DatabaseModule and MockDatabaseModule.
Authentication module
Until now, we have discussed implementing frameworks in the domain layer, but we haven’t mentioned the presenter layer. However, it operates in the same way. I created a simple AuthModule that will serve to validate the Bearer token of requests.
// src/frameworks/auth/auth.module.ts
@Module({
  providers: [AuthService],
  exports: [AuthService],
})
export class AuthModule {}
// src/frameworks/auth/auth.service.ts
// service implements IAuthService exposed by the presenter layer
@Injectable()
export class AuthService implements IAuthService {
async validate(token: string): Promise<boolean> {
return '123' === token;
}
}// src/providers.module.ts
@Global()
@Module({
imports: [
...
AuthModule,
],
providers: [
...
{
provide: AUTH_SERVICE,
useExisting: AuthService,
},
],
exports: [
...
AUTH_SERVICE,
],
})
export class ProvidersModule {}In the Presenter layer, we create an interface IAuthService inside the folder guards:
// src/gateways/guards/auth-service.interface.ts
export interface IAuthService {
  validate(token: string): Promise<boolean>;
}
We create a guard:
// src/gateways/guards/auth.guard.ts
import { AUTH_SERVICE } from '@/constants';
import { IAuthService } from './auth-service.interface';

@Injectable()
export class AuthGuard implements CanActivate {
  constructor(
    // injected service via provide AUTH_SERVICE
    @Inject(AUTH_SERVICE)
    private readonly authService: IAuthService,
  ) {}
  canActivate(
    context: ExecutionContext,
  ): boolean | Promise<boolean> | Observable<boolean> {
    const request = context.switchToHttp().getRequest();
    const token = this.extractTokenFromHeader(request);
    if (!token) {
      return false;
    }

    // calling method of the AuthService
    return this.authService.validate(token);
  }

  private extractTokenFromHeader(request: Request): string | undefined {
    const [type, token] = request.headers['authorization']?.split(' ') ?? [];
    return type === 'Bearer' ? token : undefined;
  }
}
Then we add the guard to a specific endpoint or globally inside ControllersModule.
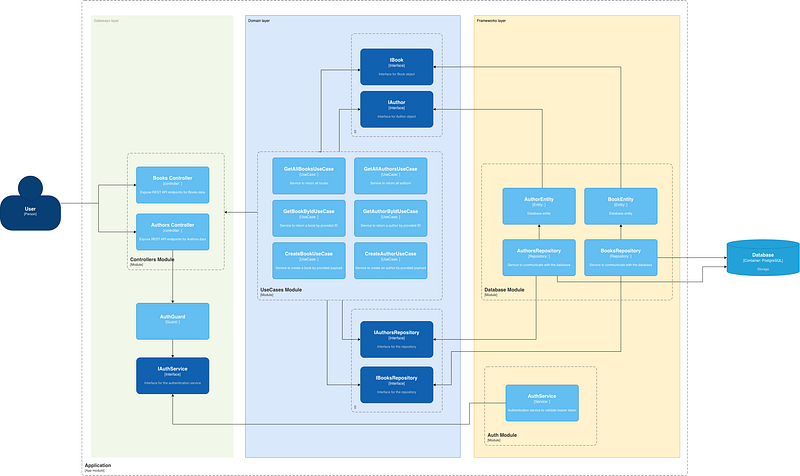
Diagram of the 3 layers
Source code: https://github.com/peterkracik/nestjs-clean-architecture/tree/1.7/app/src/gateways/guards
More info about guards https://docs.nestjs.com/security/authentication
Entities layer
In small applications, especially in JavaScript projects where we often work with generic objects based on interfaces rather than classes, having an entities layer is not always necessary. It can add unnecessary complexity. However, for the sake of a complete implementation, let’s go ahead and create and implement the entities layer as well.
If you’re following the source code by the tags I provided, it might become a bit confusing. Initially, I named the book and author interfaces Book and Author. However, when implementing the classes with the same names, it caused a conflict. To resolve this, I renamed the interfaces to IBook and IAuthor, allowing the entity classes to be named Book and Author.
I created two classes — Book and Author — inside the folder src/domain/entities. Both of these classes extend BaseEntity to inherit a common method that helps convert an object into an instance of the class and demonstrate of a method providing a “business logic” (I know it is not a real business logic method, only A method, but we could easily have there something like createSlug) inside the entity layer.
Then use cases would be slightly modified to initialize an instance of the entity ie. Author inside CreateAuthorUseCase.
// src/domin/usecases/authors/create-author.usecase.ts
@Injectable()
export class CreateAuthorUseCase implements BaseUseCase {
  constructor(
    @Inject(AUTHORS_REPOSITORY)
    private readonly authorsRepository: IAuthorsRepository,
    @Inject(NOTIFICATIONS_SERVICE)
    private readonly notificationService: INotificationsService,
  ) {}

  async execute(payload: CreateAuthorUseCasePayload): Promise<IAuthor> {
    // This is necessary only if we need some business logic to be applied to the data
    const author = new Author();
    author.fromDao(payload);

    // create author in the database
    const created = await this.authorsRepository.add({
      firstName: payload.firstName,
      lastName: payload.lastName,
    });

    if (!created) {
      throw new Error('Author not created');
    }

    // merge the created data with the author entity
    author.fromDao(created);

    await this.notificationService.sendNotification(
      `Author ${author.firstName} ${author.lastName} has been created with id ${author.id}`,
      'New author created',
    );

    return author;
  }
}
The whole diagram with the entities layer looks like this:
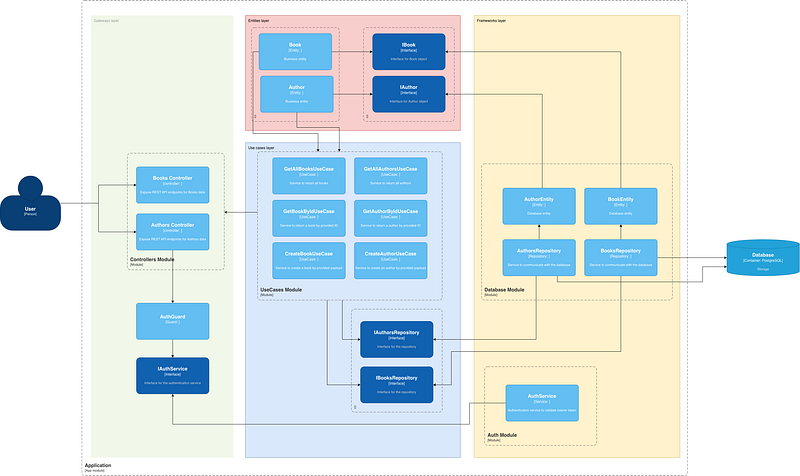
“You are importing framework libraries inside your domain layer”
import { Module } from '@nestjs/common';
...

@Module({
  ...
})
export class UseCasesModule {}
That’s true. In this example, we’re importing the Module decorator into a file within the domain layer. I consider this a “lesser evil” because, while it could be resolved, doing so would introduce unnecessary complexity.
We could create a custom Module decorator within our business layer and a new module, NestModule, within our frameworks layer, where we could provide an implementation for this module. This approach would ensure that the decorator is not dependent on the framework.
However, since NestJS provides many decorators, following the Clean Architecture principles strictly would require us to implement all of them in this way. This would likely introduce significant complexity without proportionate benefits, especially for smaller projects. Therefore, it’s often more practical to accept this “lesser evil” and use the framework’s decorators directly, balancing architectural purity with pragmatic development.
Conclusion
Does it make sense to use it for small applications?
NO, but YES!
Why No?
Implementing Clean Architecture requires a lot of boilerplate and relatively complex code, which means it takes more time to create. It also takes more time for a new developer on the project to get up to speed.
Why Yes?
If you don’t understand it and don’t get used to writing it this way in small applications, you will have a hard time once you need it in a medium or larger application.
The code is more maintainable, and as is often the case, the customer may not know exactly what they want, leading to specification changes during the development process.
As demonstrated earlier, it is super easy to change a database or notification service based on the environment — you can have different configurations on your development machine, inside a CI/CD pipeline, or in production.
Different developers can work on different parts of the application without causing issues. This is because Clean Architecture promotes a clear separation of concerns, allowing teams to develop and maintain different layers independently.
You can change the underlying framework or third-party libraries without significantly impacting the application. This flexibility is one of the key benefits of using Clean Architecture, as it isolates the business logic from external dependencies.
“You can change the underlying framework” — but this will never happen, will it?
No, you’re unlikely to switch from Nest.js to Express.js, or from Laravel to Symfony, without completely redoing the application. However, a major release of the framework could have a significant impact. If the framework’s usage is limited to the framework layer, it will simplify the update process.
Additionally, while you might not change the framework of a running application, you might want to reuse code from the business logic layer in a different framework. The less dependent the code is on a specific framework or third-party libraries, the easier it will be to reuse.
GitHub - peterkracik/nestjs-clean-architecture: Example repo of an Nest.JS app following the clean…
Example repo of an Nest.JS app following the clean architecture principles - peterkracik/nestjs-clean-architecturegithub.com
In Plain English 🚀
Thank you for being a part of the In Plain English community! Before you go:
Be sure to clap and follow the writer ️👏️️
Follow us: X | LinkedIn | YouTube | Discord | Newsletter | Podcast
More content at PlainEnglish.io